
From a sitting box to a busy hub
0.02 load? 200 MB RAM? Well, that's just inefficient.
For almost 3 years, I've owned a VPS online that's been randomly used for a great many things. I've used it for my endeavors in ethical hacking, as a NAS, as a temporary server for my various side-projects, but I've never used it for a clear and defined purpose. This ended up being rather disconcerting, since the box itself was nothing to scoff at: it was a box of 4 GB RAM, 2 GHz box with 80 gigs of SSD space, which is overkill considering what I was using it for. I mean, if I exposed a Raspberry Pi to the net and did the same things on it as I did on the VPS, it would've been significantly more cost-effective.
Ergo, after literally 7 seconds of thought and consideration, I decided to take it upon myself to put that old box to good use! After all, I have 4 gigs of RAM to use up, I'll fill them all, even if I have to use Chrome tabs to do so. But what did I need first?
I need a domain!
Turns out going to a browser and typing the IP of a server is unappealing. Who knew? I needed a domain to make sure that you can simply access my blog from anywhere. I had one for the blog (still exists, it's stormfirefox1.github.io, but I won't use that anymore since it's not really memorable), but I couldn't point to my own server with it, since I couldn't control GitHub's DNS, right? I could, but I didn't research.
I've always wanted to own a domain, and there was no time like the present. I decided to pick up a domain that would fit my username, stormhub.io, which as you can see, is currently being used by this blog! I picked Stormhub because this domain will probably eventually host many side-projects. Buying a domain is not that hard, what matters is you pick a good provider. Luckily for me, I didn't have to deal with GoDaddy, which sucks a lot, and I bought my domain from a very old provider, 007names.com, and I'm sure you can try them, too. After I bought the domain, I pointed the domain to my old box (from the Manage DNS settings), as well as a bunch of subdomains for what I was planning to use over time (the domain costs, but the subdomains were free).

Now that that's done, what was I planning to use Stormhub for? Well, I wanted to have:
- the blog
- an analytics platform for said blog
- my landing page, since everyone needs one, right?
- my password vault, because I was too lazy to carry my KeePass database everywhere
- a monitoring platform for the server, to make sure it doesn't use too much RAM and explode
Well, I have my objective, let the games begin.
root@STORMHUB_NODE_1:~# crack_knuckles
Cracking......................
Blog and Landing Page
The easiest thing to host on a server is a static site, since all you do is serve webpages, but the problem is
serving multiple separate sites from the same server. Now that's different, and how do you do that? The easiest
way would be to store all the sites under different subdirectories, but that's just bad and lazy, particularly
since you'd end up with ugly links like stormhub.io/blog/post/..., which isn't very nice. In addition, if I
ever switched to multiple servers, I'd end up having a problem with migrating the content and you, fellow
readers, to the new domain later, which might happen, who knows? Ergo, I decided to opt for a subdomain
approach of hosting all my content, which would be problematic if we were to use the same server. Why is that?
Well, as you can imagine, all domains point to an IP address, and if that IP address is the same (i.e. the same server), then you can only server one web server on port 80 (the default HTTP port) since you have, well, one server. So, how do you host multiple webservers on the same server on the same port, all while pointing all subdomains to those webservers and having them serve websites differently depending from what subdomain you queried the server from?
Through black magic, of course.
I suppose I had to pull the ultimate networking trump card out.
Reverse proxies!
Reverse proxies are essentially the, well, reverse of the proxies you are probably aware of. HTTP proxies, normally, take the packets from a specific client and send them all from the server to whatever other site the client is looking for, thus allowing for multiple clients to appear as if calling HTTP requests from one server. Commonly, this is used for anonymity for all the clients connected, as well as a way to prevent attacks to a client directly.
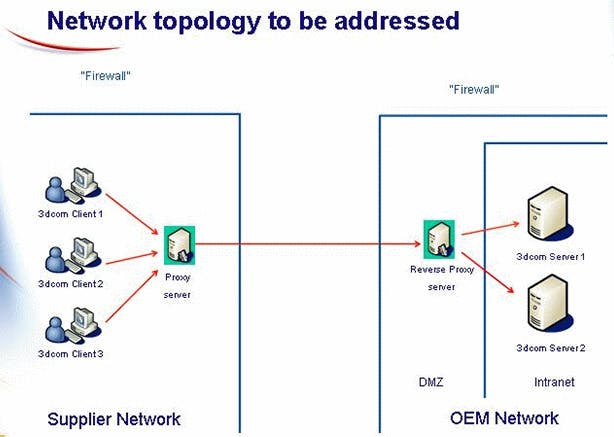
Now, reverse proxies essentially do the opposite. Instead of having multiple clients sending HTTP requests to the proxy, you have multiple servers on different ports communicating with the reverse proxy, and the reverse proxy takes all the requests it receives and routes them to the server that needs them, according to a set of. This effectively allows you to front a number of HTTP servers behind a single reverse proxy, and that means you can have multiple programs run effectively on the same port. This not only solves my single-server problem, but also allows for me to host multiple servers on the same domain using virtual hosts, which most reverse proxies have, that will allow for the reverse proxy to differentiate requests using the subdomain the request points to.
Now, firstly, I downloaded NGINX and made a new configuration file in the configuration directory for every site I would need:
root@STORMHUB_NODE_1:~# apt install nginx

# [OUTPUT SNIPPED]

root@STORMHUB_NODE_1:~# touch /etc/nginx/sites-available/stormhub.io
root@STORMHUB_NODE_1:~# touch /etc/nginx/sites-available/blog.stormhub.io
This essentially ensures that I have the sites available for use by NGINX, named by domain. Now, they're both static sites, so the configuration file is pretty simple, in fact a snippet of the original configuration file that nginx gives you.
# Default NGINX static site configuration

# This works with HTTP only, however.

server { # listening section, we'll work with SSL as well later on
listen 80 default_server;
listen [::]:80 default_server;

        root /var/www/stormhub.io/html;

        # Add index.php to the list if you are using PHP
        index index.html index.htm index.nginx-debian.html;

        # Change to the domain name you want
        server_name stormhub.io www.stormhub.io;
        error_page 404 /404.html; # custom 404 error page
        location = /404.html {    # this points to the page
                root /var/www/stormhub.io/html;
                internal;
        }
        location / {
                # First attempt to serve request as file, then
                # as directory, then fall back to displaying a 404.
                try_files $uri $uri/ =404;
        }

}
You need to make sure you don't have two "default" servers, so you might have to delete the "default" file already present in the
sites-available folder. But after that, NGINX needs a quick little refresh and it should display exactly what we want, a static
site.
You should also make sure to have only one "default_server" per each port (only one port "listen" directive that is default, basically), something I didn't do my first time and caused the server to not start. The best way to be sure it can run is to do a check with NGINX before you restart the service that runs NGINX:
root@STORMHUB_NODE_1:~# nginx -t
nginx: the configuration file /etc/nginx/nginx.conf syntax is ok
nginx: configuration file /etc/nginx/nginx.conf test is successful
root@STORMHUB_NODE_1:~# systemctl restart nginx

But, as you can probably tell, I'm not satisfied with HTTP. I mean, after all, it's very important to add HTTPS to your server, even if it's a static site, simply because it'll be easier to have HTTPS on your other servers as well. But usually, SSL certificates cost, right? Nope.
Thank you, Let's Encrypt!
Let's Encrypt allows people to get free SSL certificates that need to be renewed, provided you can prove the ownership of a domain (i.e. the A record of your DNS record points to the server you're issuing the certificate from). In my case, stormhub.io was owned by that box, so I began issuing certificated for all the domains that I would need on this server:
root@STORMHUB_NODE_1:~# certbot certonly
Saving debug log to /var/log/letsencrypt/letsencrypt.log

How would you like to authenticate with the ACME CA?

---

1: Spin up a temporary webserver (standalone)
2: Place files in webroot directory (webroot)

---

Select the appropriate number [1-2] then [enter] (press 'c' to cancel): 1
Plugins selected: Authenticator standalone, Installer None
Please enter in your domain name(s) (comma and/or space separated)
(Enter 'c' to cancel): stormhub.io, blog.stormhub.io

Performing the following challenges:
http-01 challenge for stormhub.io
Cleaning up challenges

# [OUTPUT SNIPPED]
After it can issue the challenge (which needs your HTTP server closed, so do that first), you'll get certificates for your domain
available at /etc/letsencrypt/live/[DOMAIN]/ and you can use them with anything! Awesome!
Now NGINX needed to listen for SSL and be pointed to my certificates, so I did that:
# Default NGINX static site configuration

# This only serves HTTPS, we need to redirect to this from HTTP.

server { # SSL configuration, we'll use the "default" # configuration file to redirect to this
listen 443 ssl default_server;
listen [::]:443 ssl default_server;
ssl on;

        # SSL certificate section, change accordingly
        # to the domain name you want
        ssl_certificate         /etc/letsencrypt/live/stormhub.io/fullchain.pem;
        ssl_trusted_certificate /etc/letsencrypt/live/stormhub.io/chain.pem;
        ssl_certificate_key     /etc/letsencrypt/live/stormhub.io/privkey.pem;

        root /var/www/stormhub.io/html;

        # Add index.php to the list if you are using PHP
        index index.html index.htm index.nginx-debian.html;

        server_name stormhub.io www.stormhub.io;
        error_page 404 /404.html;
        location = /404.html {
                root /var/www/stormhub.io/html;
                internal;
        }
        location / {
                # First attempt to serve request as file, then
                # as directory, then fall back to displaying a 404.
                try_files $uri $uri/ =404;
        }

}
However, now that I've changed the configuration files to only listen for SSL on 443, I need for someone to redirect visitors to SSL permanently, and that requires a different configuration file, "default", to listen on HTTP by default and redirect people to HTTPS directly.
server {
listen 80 default*server;
listen [::]:80 default_server;
server_name *;
return 301 https://$host$request_uri;
}
And...does it work? Yes, it does. Great. Now for the passwords!
An online password database?
But that can't be smart...or safe...eh, whatever.
As you know, from one of my previous posts, I use a password database called KeePass, which I used to keep all my passwords locally, locked with my YubiKey. However, there was one big problem with it: portability. I didn't have my password database anywhere but my phone and laptop, and even so, it was cumbersome to keep opening the database, since I had to sync the database using this box, always downloading 2-factor .xml files, dealing with buggy programs, etc. This had to stop, no matter how much I liked KeePass. In the end, I started looking up another open-source password manager that I could personally audit and self-host, ensuring my data was mine.
I found one called Bitwarden, and it intrigued me the moment I saw it. It is self-hosted, open-source comes with 2-factor YubiKey authentication, and could even autocomplete in your browser. It is as complete as KeePass, and even has an official mobile app. So, I said "let's try it!"
Hosting it is actually relatively easy, and it even comes with Let's Encrypt integration, but that would screw with NGINX and my certificates there, so I said "no" to all options for HTTPS in the installation process, since I was intending to put Bitwarden behind the reverse proxy.
root@STORMHUB_NODE_1:~# ./bitwarden.sh install

# \_ \_ \_ \_
# | |** (_) |_** \_**\_ \_ \_ ** **| | \_** \_ \_\_
# | '_ \| | \_\_\ \ /\ / / _`| '__/ _` |/ _ \ '_ \
# | |_) | | |_ \ V V / (_| | | | (_| | \_\_/ | | |
# |_.\_\_/|_|\_\_| \_/\_/ \__,_|\_| \__,_|\_\__|_| |\_|

Open source password management solutions
Copyright 2015-2019, 8bit Solutions LLC
https://bitwarden.com, https://github.com/bitwarden

===================================================

Docker version 17.12.1-ce, build 7390fc6
docker-compose version 1.17.1, build unknown

(!) Enter the domain name for your Bitwarden instance (ex. bitwarden.company.com): [DOMAIN]

(!) Do you want to use Let's Encrypt to generate a free SSL certificate? (y/n): n

# [OUTPUT SNIPPED]

# Select "no" for all options if looking to back with reverse proxy
Once it is done installing, you start it using ./bitwarden.sh start and it's online and ready to go! I put most
of my passwords from KeePass into Bitwarden (some didn't get imported because their encrypted value would be too
long in memory, so imagine the sheer length of the random passwords I put in there) and installed the extensions
everywhere.
Now, the problem was putting the installation behind NGINX, which is a bit more difficult than a static site. Why is that? Well, it's because a static site only needs to receive GET requests, while a web application receives POST requests, which has a body that won't be transferred by the reverse proxy in a static site configuration. That is, of course, unless you actually use the reverse proxy for what it was made for...reverse proxying.
The configuration file for the password vault was much simpler than I thought it would be:
# Default NGINX web app configuration

# Serves HTTPS only and proxies to HTTP app

server { # SSL configuration, we'll use the "default" # configuration file to redirect to this
listen 443 ssl http2;
listen [::]:443 ssl http2;
ssl on;

        # SSL certificate section, change domain
        # accordingly
        ssl_certificate         /etc/letsencrypt/live/[DOMAIN]/fullchain.pem;
        ssl_trusted_certificate /etc/letsencrypt/live/[DOMAIN]/chain.pem;
        ssl_certificate_key     /etc/letsencrypt/live/[DOMAIN]/privkey.pem;

        # Add index.php to the list if you are using PHP
        index index.html index.htm index.nginx-debian.html;

        # change domain here to what you want
        server_name [DOMAIN];
        location / {
                # Proxies to the web app's port on localhost
                # Make sure web app provides HTTP only, we'll
                # handle the HTTPS part from NGINX. Also make
                # sure the port is inaccessible through the
                # firewall, so the app won't be able to be accessed
                # directly through HTTP
                proxy_pass http://127.0.0.1:[WEB APP PORT]/;
                proxy_redirect http://127.0.0.1:[WEB APP PORT]/ /;
                proxy_set_header Host $http_host;
                proxy_set_header X-Real-IP $remote_addr;
                proxy_set_header X-Forwarded-For $proxy_add_x_forwarded_for;
                proxy_set_header X-Forwarded-Proto $scheme;
                proxy_set_header X-Forwarded-Protocol $scheme;
                proxy_set_header X-Url-Scheme $scheme;
        }

}
Turns out that it worked splendidly, and now I had both static sites and web apps easily configured on my reverse proxy. Still not done, though.
Firewall Time
The rest of the setup was more or less a chore, since setting up the rest of the services was the same repetitive action: download the server, configure said server on different port than default HTTP, turn off SSL and point to the reverse proxy, copy config, reload everything, done. For 3 more times.
I used different open-source self-hosted options for my analytics and monitoring: Matomo for analytics, which actually has some pretty cool features, like real-time visits, and Grafana + Prometheus for monitoring, which is pretty difficult to setup, but I managed with this particular guide. All of them essentially used the same configuration files as above, along with the generation of certificates from Let's Encrypt.
Now, I had to close the ports that the HTTP apps used from listening on eth0, the interface that people touched, and instead listen only on local loopback (127.0.0.1). I simply downloaded ufw and did some standard configs:
root@STORMHUB_NODE_1:~# apt-get install ufw

# [OUTPUT SNIPPED]

root@STORMHUB_NODE_1:~# ufw default allow outgoing & ufw default deny incoming
root@STORMHUB_NODE_1:~# ufw allow ssh && ufw allow http && ufw allow https
root@STORMHUB_NODE_1:~# ufw deny [PORT WEB APP USED] # one for each app
root@STORMHUB_NODE_1:~# ufw enable
Simple, right? Let's test it.

Wait, what the...
sigh Alright, alright, fine. I never really trust anything over the machine level. I started diving in to see why that didn't work. Simplest way to check is to check what file ufw actually edits, the iptables list, let's see what that said.
root@STORMHUB_NODE_1:~# iptables --list
Chain INPUT (policy DROP)
target prot opt source destination
ufw-before-logging-input all -- anywhere anywhere
ufw-before-input all -- anywhere anywhere
ufw-after-input all -- anywhere anywhere
ufw-after-logging-input all -- anywhere anywhere
ufw-reject-input all -- anywhere anywhere
ufw-track-input all -- anywhere anywhere

# [OUTPUT SNIPPED]

Chain DOCKER (4 references)
target prot opt source destination
ACCEPT tcp -- anywhere anywhere
ACCEPT tcp -- anywhere anywhere
ACCEPT tcp -- anywhere anywhere
ACCEPT tcp -- anywhere anywhere
ACCEPT tcp -- anywhere anywhere
ACCEPT tcp -- anywhere anywhere
ACCEPT tcp -- anywhere anywhere
ACCEPT tcp -- anywhere anywhere
Ah, well, see, this is where things went wrong. Bitwarden uses Docker to host itself, which allows for easy deployment,
but many complications on the lower level. Docker likes to be invasive, so turns out that it doesn't like the
firewall rules it gets from the predefined chains (groups of rules) and makes its own chain, which is managed
by the Docker environment, not ufw. All we had to do, essentially, was find whether Docker asked to bind a port
and simply add 127.0.0.1: in front of every mention of a port, and that solves the problem.
Perfect! Stormhub is fully operational!
Conclusion
Now I have a pretty decent set of tools online that allow me to work in my own environment, and they're all safe, audited and open-source! I'm loving it. Surprisingly enough, they're not as resource-intensive as I estimated, using only ~2 GB out of all the available RAM. Nice. Maybe I'll slap on some extra stuff.
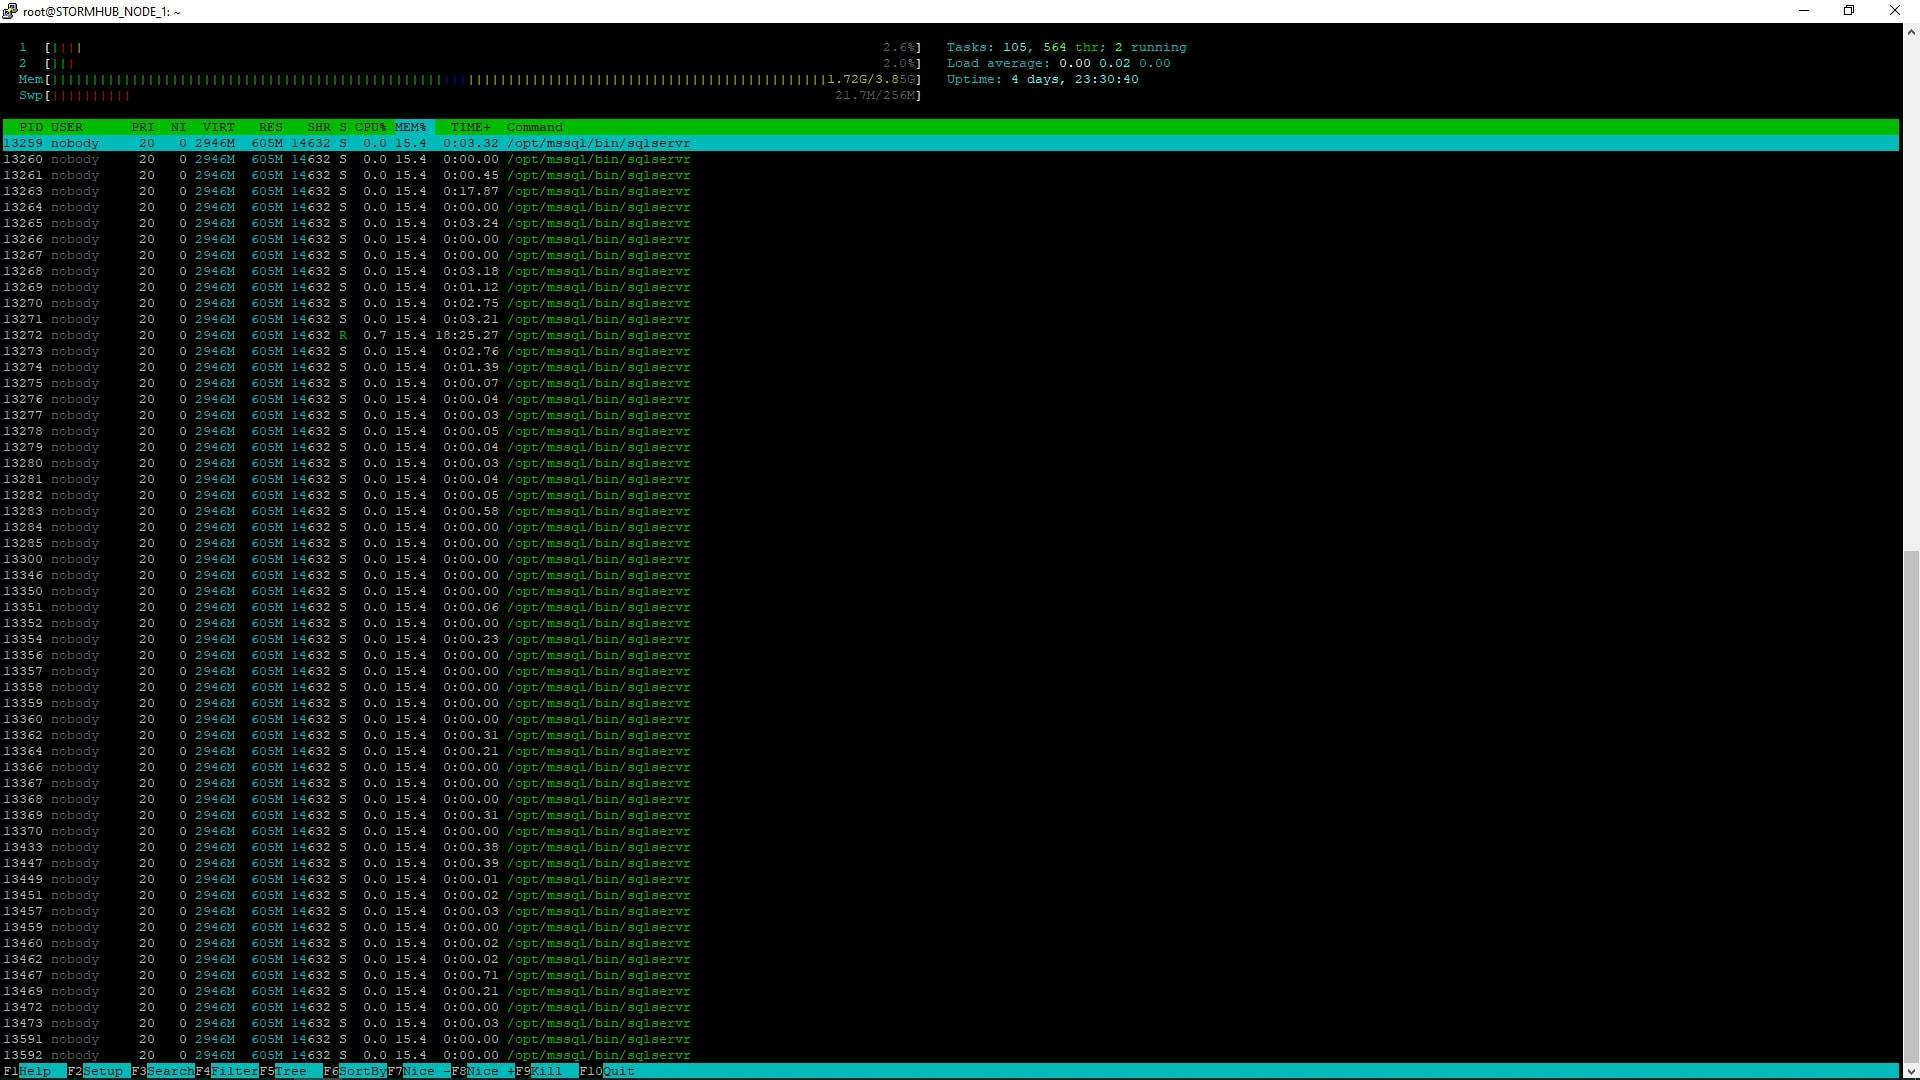
Thanks, Microsoft SQL, for ruining my htop output.
Alright, now I'm in the mood for some JavaScript, and that's rare. Let's see what comes out of it.